MENU

Showing posts with label Thank You. Show all posts

Wednesday, 15 December 2021

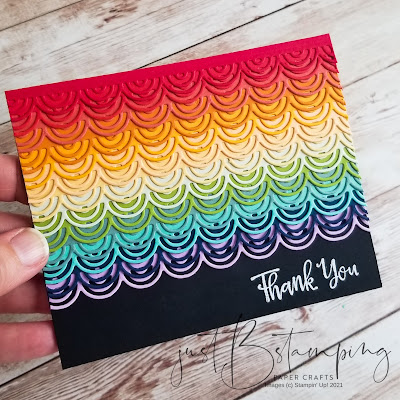
Thank You Stamping Symphony Blog Hop

Our theme for this month's Stamping Symphony blog hop was "Thank You", and I was so happy to play with something not holiday related!  I love me some Christmas, but every now and then you have to throw in something different to freshen your perspective.  

Stampin Up Brilliant Rainbows Dies

Saturday, 2 October 2021

Blackberry Bliss Ombre Colour Challenge (TGIFC#336)

I'm back with another #TGIFC challenge card today.  This week was a colour challenge using a combination that I have never used before:  Very Vanilla, Blackberry Bliss and Black.  I substituted Basic White for the Very Vanilla, as I didn't have any (!) and decided to create my own black/white DSP background with an ombre technique to make the Blackberry Bliss really shine!

Stampin Up Blackberry Bliss

Wednesday, 10 February 2021

Wow Wednesday Thank You Fun Fold

 Every Wednesday on social media I post a "wow" project, and this one sure fits the bill!  

Have you ever bought an entire pack of paper because you fell in love with one design?  That's this paper for me (although I ended up liking most of the other designs too!).  The paper on the left, with those beautiful green berries, is my absolute favourite out of the pack.

I created my card base with a piece of thick vanilla cardstock cut to 4.25" x 11", and scored at 2.75" and 5.5".  You fold the scores into one mountain and one valley fold, and voila--a z-fold card is born!

I covered the two smaller panels with DSP (including the watercolour stripes paper which is my 2nd favourite from the pack), and left half of the back panel uncovered so that a personal message can be written there.

The front sentiment is all about the layers!  I started with a stitched scallop rectangle in vanilla cardstock, and then cut two additional stitched scallop rectangles out of Soft Sea Foam and Pretty Peacock.  I'll be so sad when the Peacock paper and ink retires later this year, it is such a beautiful colour and I haven't used it nearly enough.  

It's hard to see in the pictures but I embossed the sea foam rectangle with one of the Greenery Embossing folders...in real life it adds a nice little bit of texture to the sentiment.

What really puts this card over-the-top is the gorgeous Forever Gold Metallic paper die cuts I layered behind the green scalloped rectangles.  They are so shiny it's a challenge to get a picture without your reflection showing up!  And the delicate details just add so much elegance to the card.

The hand written "thank you" stamp is from the Heal Your Heart set, which I am featuring all week.  This set is free with the current Salebration promotion, you can check it out on my store any time. 

And to top it off I added several rhinestones leftover in my stash from Christmas.  There are some new Gilded Gems that would look great here too!

Thank you for stopping by my blog, I hope you are inspired to create a wow card of your own today!

Barb

Sunday, 31 January 2021

Berry Blessings Thank You Card

 I adore the free Salebration Berry Delightful Designer Series paper!  My card this week highlights my favourite page from the paper pack, some soft and dreamy strawberries on the vine:

That paper is so beautiful I didn't have to add much to make it my focal point!  I matted a 2.75" x 4" rectangle of patterned paper on a slightly larger Real Red base.  I added a few banners in coordinating paper and cardstock to finish the piece.

I embossed a 4" x 4.25" white panel with the Ornate Floral 3D embossing folder--this is my go-to these days, it's got SO MUCH dimension and texture.

I added a strip of coordinating DSP matted on Garden Green across the top of the white panel, and added my DSP rectangle on top with dimensionals.

Finally, I die cut a stitched label from the Stitched So Sweetly Dies after stamping my sentiment in Real Red ink.  

I kept the inside of my card simple, with a strip of coordinating DSP and a Thank You sentiment, again in Real Red ink.

This card was quick to come together and highlights my favourites from the suite.  I'll be sharing more projects all week, and you will definitely see some more of that beautiful paper!

Thank you for stopping by, 

Barb

Monday, 3 June 2019

In Colours with Kylie's Blog Hop

I've been spending time getting to know the five new In Colours from Stampin' Up! this week, and they complement some of our forever colours so beautifully.  I decided to enter this card into Kylie Bertucci's International Blog Hop, so if you enjoy it as much as I do please consider voting for me here http://bit.ly/KyliesInternationalHighlightsJune2019VoteformeHere


I actually started with Terracotta Tile and paired it with Petal Pink....and then couldn't stop!  Is there anything more fun than making the same card in a variety of colours? :)  And with the coordinating linen ribbon and DSP these cards came together in a flash.


Introducing the 2019-2020 In Colours:

Pretty Peacock (with Blueberry Bushel)

Purple Posy (with Highland Heather and Gorgeous Grape)

Seaside Spray (with Pacific Point)

Rococco Rose (with Blushing Bride)

Terracotta Tile (with Petal Pink)

I started each card with a Thick Whisper White base scored into a "fancy fold"--a twisted gate fold, with one side being 1.5" wide and the other 2.75" wide.  Here is a visual of how the cards open:


I layered each front panel with a piece of coordinating DSP.  This double-sided paper made it super easy to get two matching patterns for my card front, but I debated for a while about whether to use just one pattern instead.  I'm happy with my final choice to use both.  :)

I stamped the image from Painted Harvest in two colours, using the lightest colour for the bigger stamp and the darker colour on the small one.  The inside of each flower is Crumb Cake.  There is so much dimension to this set even without using two colours, but I really wanted to highlight how well the new colours pair with some existing favourites.


I cut the stamped image with the stitched squares dies and then layered that on a piece of matching cardstock.  Before I mounted that to the Crumb Cake square with dimensionals I added a "Z" of matching Scalloped Linen Ribbon.  It really is so pretty.


I have had a hard time trying to choose my favourite card from this set, but I think I have it narrowed down to the Purple Posy or Pretty Peacock...or Seaside Spray....

Which one is your favourite?

Barb

PS  I'd appreciate your vote for me here http://bit.ly/KyliesInternationalHighlightsJune2019VoteformeHere