MENU

Showing posts with label Rainbow. Show all posts

Sunday, 6 March 2022

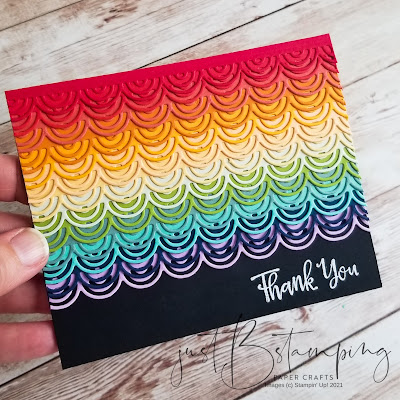
Creation Station Rainbow Rearrange Blog Hop

The theme for the Creation Station Blog Hop this month--Rainbow Rearrange--threw me for a bit of a loop!  But after thinking a little while I thought of the perfect card design:

Wednesday, 15 December 2021

Thank You Stamping Symphony Blog Hop

Our theme for this month's Stamping Symphony blog hop was "Thank You", and I was so happy to play with something not holiday related!  I love me some Christmas, but every now and then you have to throw in something different to freshen your perspective.  

Stampin Up Brilliant Rainbows Dies

Saturday, 15 June 2019

Above the Clouds (Stamping Symphony Blog Hop)

It's time for another Stamping Symphony Blog Hop!  Thanks for hopping along with us. :)

This month we are featuring our favourite item from the new catalogue and I have to say...it was an incredibly tough choice!  I'm still not sure this is my very favourite yet, as I love a lot of the new items, but this one is definitely high on the list (no pun intended).


This is one of the images from the Above the Clouds stamp set, which I stamped in Memento ink and then punched with the coordinating Hot Air Balloon Punch. I coloured my rainbow balloon with the Blends markers and I love how I was able to get the shading so easily with these markers.  They make me feel like an artist every time!

I die cut a stitched rectangle out of Whisper White paper and sponged the edges in Pool Party to give a soft sky look to my background.  I really wanted the coloured balloon to pop so I kept everything else very minimal on my card front.


I added some Smoky Slate clouds to the background piece and then mounted it onto a Thick Whisper White card base.  I added the balloon, basket, and trail of flags (also coloured in rainbow order) using Dimensionals, and they really look like they are going to float right off the page.


I finished the card by stamping "Let your dreams soar" in the bottom left corner in Basic Gray.  Inside I added another line of coloured flags and a sentiment.


This would be a great graduation card, or even a farewell card for someone heading off on their next adventure.

Please leave me a comment below before you hop on to see what everyone else created for you this month.  I truly appreciate your time!


JustBStamping (Barb--you're here!)

Thanks for hopping by!
Barb


Friday, 15 February 2019

Happy Days Blog Hog (Stamping Symphony)

The dreary days of winter are definitely upon us--between the bitter cold and the ice storms I am ready for Spring!  We may not be able to rush Mother Nature, but our theme for this month's Stamping Symphony Blog Hop was to highlight the "cheer" in the new Occasions and Saleabration catalogues, and I think my card fits the bill!


Nothing says cheery to me like a rainbow. :)  I just received a package of the 6x6 DSP in Bright colours and couldn't choose just one to use, so I made a rainbow background of five of my favourites!


Wondering how I managed to get such perfectly spaced and lined up sentiments?  I used my awesome Stamparatus!  This hinge technique is definitely my favourite use of this tool, and I was able to clean my stamp to switch colours super easily with my Stampin' Shammy.  Definitely a wow look in my opinion. :)


I coloured my layered cake in matching(ish) colours....I didn't have all of the colours in Blends but I think the ones I had were close enough in such small amounts that no one will be the wiser.  ;)

I popped up my finished cake, mounted on a Gray Granite stand, with dimensionals on top of the ribbon and added a tiny little bow to finish it off.


To keep my rainbow theme going on the inside of my card I sponged three shades of ink onto my sentiment, going from pink to blue to purple in one fell swoop.  I added another rainbow cake in the bottom corner to complete the look.

Ready to check out what everyone else did this month?  Links are below, and keep scrolling to see a Bonus Card I made!

JustBStamping (Barb--you're here!)

Bonus Card:  I didn't want to waste any of that fun rainbow background, so before assembling my card I used the new Stitched Rectangles dies to cut a piece out of the middle (which gets covered by my front panel).  I used this rectangle as the mat for a second card--two for one!


I used another one of the cake stamps from the Piece of Cake stamp set (there are 6 total to pick from) and tried a tie-die affect with my Blends.  This was just an experiment but I LOVE how this turned out!  I coloured the cake stand with my blends as well to highlight a shadow, and added some candy cake toppers and a ribbon to finish it off.


I had so much fun with the tie-die technique I coloured one more cake for the inside. :)

I think either of these cards would help the recipient feel cheery despite the awful weather.  They certainly raised my spirits and the sun did come out today for a little bit, so here's hoping we are on the upswing now!

Barb


Sunday, 25 March 2018

Final Freebie Celebrate You Card

That's right, Sale-A-Bration officially ends on March 31, so there are just days left to earn some great free products that coordinate with items from the Stampin' Up! Occasions Catalgue (those are still available until the end of May). 

Without a doubt my most-used Sale-A-Bration item has been the Celebrate You die set.  It comes with three versatile word dies--Celebrate, Amazing, and You--in three fantastic fonts, allowing you to mix and match to your hearts content!  Mostly I have been using the "celebrate" die, so this week I wanted to show you something "amazing," pun intended ;).


Yes, I know, another rainbow card!  I can't stop myself!  Perhaps I'm dreaming of some spring rain
and sun after a gloomy white winter?

I started with a Thick Whisper White card base and added an embossed mat using the newly released Basket Weave Dynamic folder.  This was just released as a Sale-A-Bration freebie in February, and will be carrying on in the new annual catalogue as well.  The Dynamic embossing folders are quite thick compared to regular embossing folders, and leave a very deep impression.  I gently spritzed my white cardstock with plain water before running it through my Big Shot, so that the paper really took the impression cleanly, and to reduce the risk of tearing.

I cut a stitched circle out of watercolour paper and coloured my rainbow with an aqua painter and a bunch of bright ink colours (Real Red, Pumpkin Pie, Daffodil Delight, Lemon Lime Twist, Bermuda Bay, and Sweet Sugarplum), allowing the colours to blend organically where they met.  This is such a fun way to play with colour!

Once my rainbow was dry I spritzed the entire circle with water droplets (I find the farther I am from the surface, the finer the mist that hits the paper), and used a paper towel to quickly absorb the water, removing a bit of the colour and giving the piece that rain splattered look.


I cut my sentiment, "amazing", from more thick whisper white cardstock, just to give it more strength since I knew it was going to be wider than my circle base.  I adhered it to the circle using my fine tip glue pen, which was a pain-free way to glue something so intricate.  Love it!

I mounted the circle to the front of my card with a couple of dimensionals, because I can't make a card with them. :)

This card came together so quickly and easily I just had to make another!  This one uses some retired Stampin' Up! products (the Heart thinlits, "Joy" die, and the embossing folder), but once it popped into my head I had to get it out!


I added a little bit of white shading around the edge of my heart with Whisper White craft die and a sponge dauber, just to soften the edges. 

Don't miss out on your last chance to get your hands on these amazing Sale-A-Bration items before they are gone forever!  Also, the 2016-2018 In Colours (Dapper Denim, Emerald Envy, Flirty Flamingo, Peekaboo Peach and Sweet Sugarplum) are set to retire on May 31.  The retiring colours and their coordinating products SELL OUT FAST!  So don't delay!  (Flirty Flamingo is one of my personal faves)

I'm looking forward to a few big events over the next couple of weeks--Easter this weekend, and OnStage next weekend  (that's where I get a sneak peek at the new annual catalogue coming out in June!!).

What are you looking forward to this week?

Have a good one,
Barb

Product List

Sunday, 18 February 2018

Hometown Greetings in a Whole New, Colourful Light

One of my favourite Christmas products last year were the Hometown Greetings Edgelits, so I was ecstatic to see that they were carrying forward into 2018!  This weekend I needed a break from my Brushos ;) so I thought I would tidy my craft room and low-and-behold, there they were.  Challenge, accepted.  I knew there would be a way to make these "christmas" dies into something usable year-round.

I love the look of mostly white cards, they are so clean and simple.  But I also love the rainbow of colours Stampin' Up! has to choose from.  So I decided to merge the two looks into one!


This would make a great "happy new home" or "welcome to the neighborhood" card, but with the "Happy for You!" sentiment (from the In the City hostess set) it could be used for lots of other occasions as well.

And wait until you see all the colours I used!!!!


I cut multiple sets of the houses out of Thick Whisper White and sponged a rainbow of colours onto each layer.  Quick tip:  Stampin' Up! very nicely provided a colour wheel of all of their ink colours in rainbow order in the 2017-2018 Annual Catalogue, which came in very handy when picking my ink pads and determining their proper order.  My daughter helped me organize all of my ink pads and sponge daubers (she loves rainbows too!).

This look could be obtained using wwaayy fewer colours, but I had them, so I thought I might as well use them!  To recreate with fewer options, just sponge two colours on one house...they will blend beautifully and leave you with a unique "in-between" colour to help make the transition from one colour to the next.  Here is a close up of the houses, and you can see how I transitioned from Tempting Turquoise to Rich Razzelberry in the top row, fourth house in.


Isn't that too much fun?!

I adhered the tallest piece (blues and purples) directly on to my card base (after creating my clouds, see below); I then popped up the next piece (yellows and greens) on top using dimensionals; and finally, attached the top piece (pinks, yellow and oranges) using more dimensionals.  You really can't have enough 3Dness here, can you?  Check out those layers...


Did you notice the clouds at the top of the card front?  Here's a closer look, it's just a very subtle, soft sky look.  I sponged some Pool Party on top of a cloud-shaped mask I made out of chipboard.


This card was so much fun to make, and I left the inside blank to keep it as versatile as possible.

What have you made in rainbow colours lately?

Barb


Product List