MENU

Showing posts with label Stampin' Up. Show all posts

Sunday, 5 April 2020

Wishing You Brighter Days Ahead

I hope you are all safe and well.

This month's paper pumpkin kit could not have included more appropriate sentiments for the current world situation.  I've been doing craft-therapy this weekend, escaping from the news and learning a new watercolouring technique I am excited to share with you.


I LOVE watercolouring and was interested to find this new, simple, and fast method using markers!  The markers of course need to be water-based for the technique to work, but it is super simple and I was able to get backgrounds for 7 different cards in just minutes.  They are all different, and I've included a pic of each at the end of this post, but they are all based on the same techniques outlined here.

To make the background I scribbled (and I mean, scribbled, there was nothing pretty about it!) some ink with my Gray Granite, Poppy Parade, Pear Pizzazz and Granny Apple Green markers onto watercolour paper.  Then I took my aquapainter and applied a LOT of water over each section, making sure the colouring lines disappeared and gently blending the colours together.  Then I sprayed the whole thing with more water and set it aside to dry.  You could also hit it with your heat gun but I found I liked the look of the natural drying better.

While my backgrounds were drying I white embossed two sets of rain boots from the Paper Pumpkin kit, and one set of flowers from the Saleabration Happy Birthday (retired) set.  I coloured each set to match the background using my ink pads and aquapainter.  I fussy cut the boots and used the coordinating die for the flowers, fussy cutting it into two pieces easily.  The second set I used on the inside of my card, here is a close up of that set.


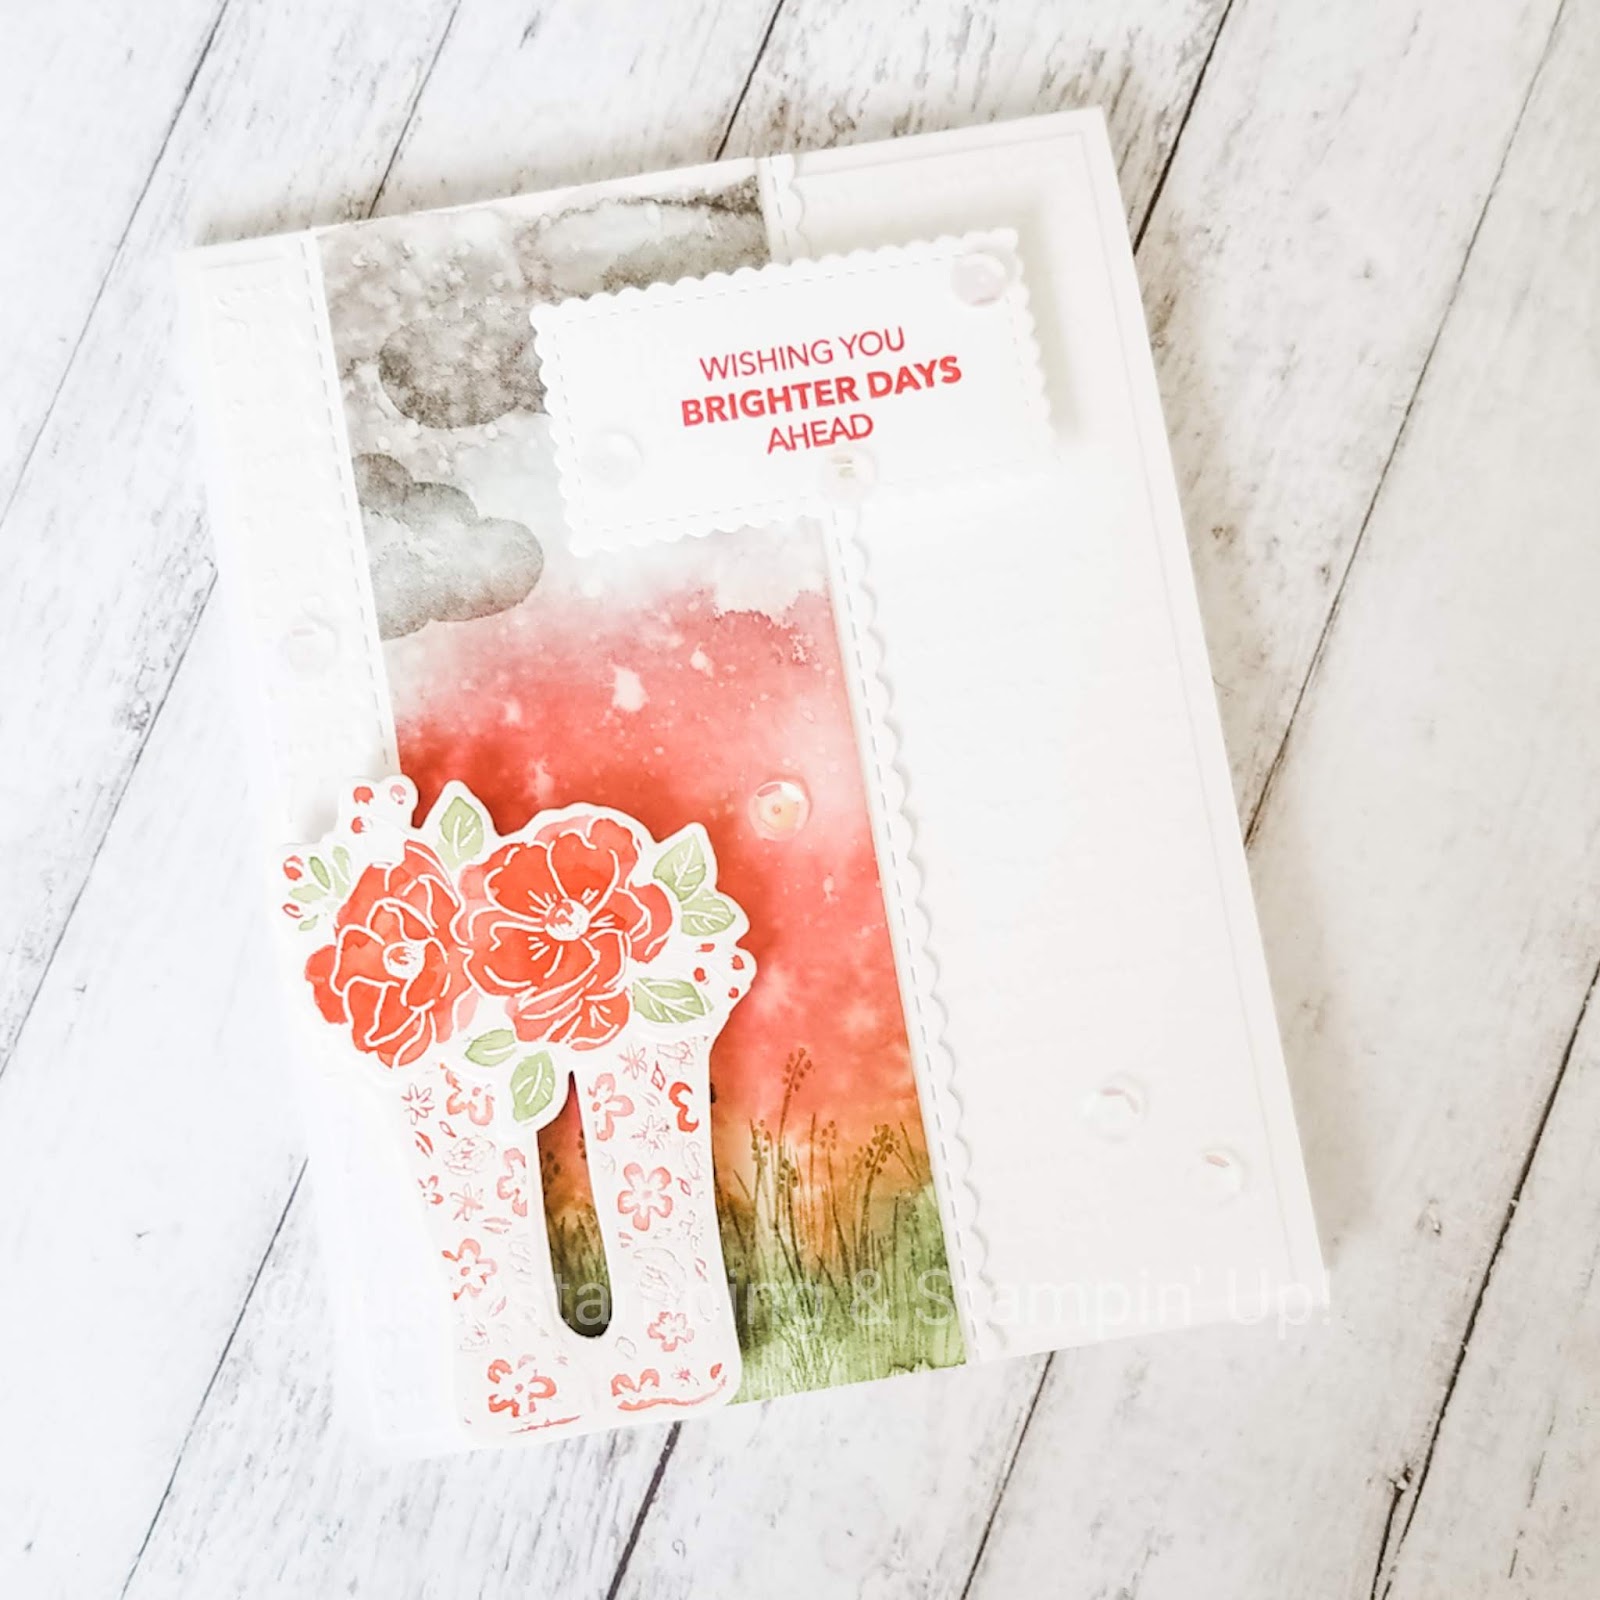
When my background was completely dry I used the paper pumpkin set to stamp clouds (Gray Granite) and grass (Granny Apple Green) onto the panel.  I love how it gives that washed-out background some definition.


I used a thick Whisper White card base and then added a white panel that was dry embossed with the Scripty 3D Embossing Folder on top (hard to photograph but in real life it gives the card tons of texture).  I framed both sides of a strip of the watercolour background with a stitched scallop edge from the Stitched Be Mine die set.  I popped up my matching watercoloured boots and flowers on dimensionals and heat embossed my sentiment in white on a layered strip of Poppy Parade cardstock.

I challenge you all to make and send some cards this week.  We can all use some happy mail these days!  

As promised, here are the other cards I made, all different layouts and different colour combinations.  If you have eagle eyes you'll notice that I added some clear sequins to some of the designs as well.


Stay safe and well, and share the love--it's more important now than ever!

Barb


Sunday, 7 April 2019

Fun coming your way!

I'm so excited to offer my first sampler class--focusing on Spring!  If you are like me this weekend has gotten you ssoooo ready for some sun and flowers and birds.  We've had just a taste of the warmth, now bring on the sunshine to go with it!

While we wait for Mother Nature to cooperate we will have to make our own sunshine, and this pastel floral sampler hit the spot for me.


This workshop will use a lot of fun products and you'll leave with a completed project ready to frame and display in your home (frame not included).  See my "SPRING Sampler" page for more details (button at the top on the menu).

Also coming your way are these fun shaker cards at my monthly Techniques class (Thursday, April 25, 7pm).  I'll teach you how to make these great interactive cards, designed to use for all your spring events:  birthday, wedding and graduation.


You can RSVP for the shaker class on my website too!  


Friday, 15 February 2019

Happy Days Blog Hog (Stamping Symphony)

The dreary days of winter are definitely upon us--between the bitter cold and the ice storms I am ready for Spring!  We may not be able to rush Mother Nature, but our theme for this month's Stamping Symphony Blog Hop was to highlight the "cheer" in the new Occasions and Saleabration catalogues, and I think my card fits the bill!


Nothing says cheery to me like a rainbow. :)  I just received a package of the 6x6 DSP in Bright colours and couldn't choose just one to use, so I made a rainbow background of five of my favourites!


Wondering how I managed to get such perfectly spaced and lined up sentiments?  I used my awesome Stamparatus!  This hinge technique is definitely my favourite use of this tool, and I was able to clean my stamp to switch colours super easily with my Stampin' Shammy.  Definitely a wow look in my opinion. :)


I coloured my layered cake in matching(ish) colours....I didn't have all of the colours in Blends but I think the ones I had were close enough in such small amounts that no one will be the wiser.  ;)

I popped up my finished cake, mounted on a Gray Granite stand, with dimensionals on top of the ribbon and added a tiny little bow to finish it off.


To keep my rainbow theme going on the inside of my card I sponged three shades of ink onto my sentiment, going from pink to blue to purple in one fell swoop.  I added another rainbow cake in the bottom corner to complete the look.

Ready to check out what everyone else did this month?  Links are below, and keep scrolling to see a Bonus Card I made!

JustBStamping (Barb--you're here!)

Bonus Card:  I didn't want to waste any of that fun rainbow background, so before assembling my card I used the new Stitched Rectangles dies to cut a piece out of the middle (which gets covered by my front panel).  I used this rectangle as the mat for a second card--two for one!


I used another one of the cake stamps from the Piece of Cake stamp set (there are 6 total to pick from) and tried a tie-die affect with my Blends.  This was just an experiment but I LOVE how this turned out!  I coloured the cake stand with my blends as well to highlight a shadow, and added some candy cake toppers and a ribbon to finish it off.


I had so much fun with the tie-die technique I coloured one more cake for the inside. :)

I think either of these cards would help the recipient feel cheery despite the awful weather.  They certainly raised my spirits and the sun did come out today for a little bit, so here's hoping we are on the upswing now!

Barb


Sunday, 18 November 2018

The Elves Have Arrived!

Our Elf on the Shelf arrived this week and has already been causing quite a stir.  It seemed only appropriate then that elves inspired my card this week too!


Isn't this snow scene too much fun?!  I had a great time colouring my elves all different colours and pretending they worked in different departments at the north pole. ;)  I used my Blends alcohol markers, which make blending and shading so easy.

Here's a closer look at the elves....


 And I added the Big Guy and Mrs. on the inside....


This card has so much depth, and really captures the fun of the season.

Which elf is your favourite colour?

Barb


Product List

Sunday, 21 October 2018

Sprig Wreath Decor

It's been a while since I made a home décor piece with my craft supplies, so I decided to take a break from my buffet prep and make a plank sign.  These signs seem to be all the rage right now, and I bought a board way back in the summer to do something with...I just didn't know what!

I was inspired by some great projects on Facebook and Pinterest, and had to make a wreath with the new Sprig punch.  I thought it would take forever to punch out all the sprigs, and tons of paper too, but it was actually very fast.  And I only used about 3 pieces of paper (mostly I used scrap pieces).


And here is a full view of the board, and a card that also features the Sprig Punch:


The wreath came together very quickly.  I started with a large garden green circle and cut the centre out with a smaller circle die.  Then I started layering the sprigs on top, until I was happy with the depth and thickness.  

I used the new Merry Merlot & Copper Ribbon, wrapping it around my wreath, tying a bow, and stapling the ends to the back of the whitewashed board.  I used a glue dot to keep my ribbon in place,
but still allow the wreath to swing, rather than gluing the wreath directly to the board.

Finally, I topped the wreath with some copper die cuts, glued gently to the sprigs.

Here is a closer view of the card as well.  This card is one of the options at my Christmas Card Buffet this weekend.  There are still a few seats left if you are interested, just email me by Tuesday to get in on the fun!


Have a great week,
Barb


Sunday, 4 February 2018

Retirement Card & Big News

Happy Sunday Everyone, another week--and another month--has come and gone.  I have been working on LOTS of projects using my new products from the Occasions catalogue.  And I have other big news....stay tuned to the end of today's post to find out. ;)

Salebration is almost half over but don't worry, there is still lots of time earn FREE items. :)  My card this week features the Celebrate You thinlit dies, which I earned for FREE restocking my cardstock supply.  What a deal!  Click here to find out more:  Free Saleabration Items Here

My husband's co-worker, Wally, retired last week, and since they have worked together for 20+ years we wanted to send him off to his next adventure with a fond farewell.  I was tasked with creating a card for the group to sign with their well wishes.

Wally is a Labatt's Blue drinker, so I had a great excuse to purchase the new Bubble Over Bundle from Stampin' Up!.  This set is so versatile, and while I have used it for beer bottles this time it could just as easily be used to create soda pop, cider, coolers or lemonade bottles.  The bar is the limit!

I made my card extra-large so there would be lots of room for everyone to sign their name and leave a little note of good wishes.  This was easily accomplished by folding in a half a full sheet of 8.5" x 11" thick Whisper White cardstock.  It also allowed me to fit 10 bottles of "beer" on the front to kick off the celebration!


As I mentioned, Wally's beer of choice is Labatt's Blue, so I used their label as inspiration for my colour choices.    My bottles are cut out of Soft Suede cardstock with the coordinating die and I sponged Soft Suede ink on the edges to give the illusion of 3D.  The labels are also cut with a coordinating die from Pacific Point cardstock.

Do you recognize my maple leaf?  It comes from the Wickedly Sweet Paper Pumpkin stamp set.  Paper Pumpkin is so cool--you get everything you need to make an awesome project, and you are left with a stamp set you can use again in the future.  The gift that keeps on giving!  And it gets even better during saleabration, because if you purchase a pre-paid subscription it counts towards getting you FREE products.

For my background I used some of the Bubbles and Fizz DSP which was mounted onto Silver Foil paper, then onto Bermuda Bay, and then onto Real Red.  I adhered some of the beer bottles directly onto the DSP, but I popped a few up with dimensionals as well.

Using those FREE Celebrate You thinlits, I cut "celebrate" from Silver Glimmer Paper and Basic Black cardstock, offsetting my black just a wee bit to form a small shadow.  This was mounted onto a vellum banner, with a small Whisper White banner behind to hide the adhesive.

I kept the inside very simple so as not to take away any writing space.  Another beer bottle glued on top of a sponged Pacific Point oval, a quick sentiment, and complete!


It's hard to see in my photo but I used the Teeny Tiny Wishes set to add "Happy Retirement" under the "May your days bubble over with happiness" sentiment from the Bubble Over stamp set.  And I used a little trick to change "day" to "days"....I stamped the sentiment first, cleaned the stamp, and then inked only the 's' from "happiness" and added to "day."

And now for the big news!  I finally figured out how to make a Facebook Business Page!  I spent a great deal of time this weekend working on it, so if you haven't seen it yet, please do pop by and let me know what you think.  Just click here to get you there fast!  All feedback will be taken as constructive criticism. :)

What would be your favourite drink to make with these awesome stamps and dies?  I'm going to try a raspberry vodka cooler next!

Barb


Product List