MENU

Showing posts with label Saleabration. Show all posts

Friday, 15 July 2022

Stamping Symphony Saleabration Spotlight

Welcome to my blog and the Stamping Symphony Saleabration Spotlight--how's that for a tongue twister?!  It may be tricky to say but my card this month is super easy to make, and features my favourite Saleabration die set, Tree Lot Dies:

Camper Colourful Clouds

Sunday, 7 February 2021

Sweet & Simple Sympathy

 No one enjoys making sympathy cards but I think they should still be beautiful, and the Heal Your Heart stamp set makes it easy to create pretty, simple cards of condolence.

For my card this week I paired the "sorry for your loss" handwritten sentiment with some lightly stamped daisies and a layered, textured background.

To create my background I started with white cardstock panel cut to 3.75" x 5.5" and lightly sponged So Saffron ink over a stencil in the bottom left corner only.  With the sponging you get a fade-away look  as you move outward, for a natural ombre effect.  I then ran the panel through my embossing machine with the Tasteful Texture 3D embossing folder, which gives it just the right amount of texture.  I mounted the embossed panel on a So Saffron card base and rounded the bottom right corner for some added interest.

I saw this great, soft effect for the daisy on Instagram and instantly loved it.  You achieve the look by lightly colouring the stamp with markers!  I just flicked my Gray Granite marker from the inside out, and coloured the centre with So Saffron.

I heat embossed that beautiful sentiment in white on a strip of Gray Granite paper that stretched across the front of my card, and anchored it with my coloured daisies (two layered on top of each other).

I repeated the front of my card on the inside, but flipped the image to the bottom right corner and skipped the embossing folder, so there was a smooth surface for writing a message.  Many months ago I received the sentiment stamp I used inside in a Paper Pumpkin kit, and it remains my go-to sentiment for sympathy cards, because it really says it all:  "the loss is immeasurable, but to is the love left behind."


All this week I will be showcasing this great, free stamp set.  There is a great variety of sentiments included in the set, and I love the mix of handwritten fonts.  I also used some fun techniques and folds this week, so be sure to follow me on Instagram and Facebook to see everything.

Have a great week,

Barb


Sunday, 10 January 2021

Ice Cream Birthday

Is there anything more birthday than a stacked ice cream cone shaker card?!  I just LOVE the new Sweet Ice Cream stamp set, punch and paper.  And I couldn't resist making a shaker card with the coordinating sprinkles!!!  


I used a colour scheme of Bermuda Bay, Pacific Point and Granny Apple green for my inspiration.  That is once again the beautiful ombre paper from the free Saleabration collection--it comes in such yummy colours!  

I stamped the Happy Birthday sentiment from the stamp set in versamark ink on Bermuda Bay cardstock and then heat embossed it in white powder.  It's so great to have a large sentiment, as it allowed me to fussy cut it for a more free-form look.


I always create my shaker window as a separate piece from the card base, so that I can ensure it is sealed up tight.  I used the largest rectangle from the Stitched So Sweetly dies and created my own window by cutting out the inside of the rectangle with square dies (just run the square die through your cutting machine multiple times, moving its position until you get the opening you want).


I added a piece of the DSP to the back of the window...those little sprinkles are so fun!  And I filled my shaker with a combination of the sprinkles from the suite, sequins, and small metallic beads so that is makes a great sound when shaken up.

I stamped the ice cream scoop in my three colours and stacked them on top of a Cinnamon Cider/Soft Suede ice cream cone, all of which were punched out with the coordinating punch.  I then used glue dots to add a few of the sprinkles to the top of my cone, because every cone needs sprinkles!


And for a finishing touch I added some of the new Whisper White twine tied in a sweet little bow.  

For the inside of my card I added another single-scoop cone and the sentiment "with sprinkles on top."


This card works for men, women, kids--everyone!

I'll be featuring this suite all week on my Instagram (@justbstamping) and Facebook pages (justBstamping) so I hope you'll join me there to see all my ideas.

Also, in case you missed it last week, I announced a few ongoing events too:

- Freebie Friday; every Friday I'll choose a random winner from everyone who commented on my social media pages and send them a card as a thank you

- Surprise Saturday; every Saturday at 2pm we will meet for this free event where you will assemble a mystery card using your supplies and my design.  RSVP to receive the link to the event and the list of supplies/measurements to gather ahead of time.  

I hope you'll consider playing along, crafting is so much more fun when it is shared with others!


Sunday, 15 March 2020

Stamping Symphony Blog Hop--Thoughtful Blooms

I am so grateful to have a crafty escape these days!  For a little while I can put aside the constant stream of pandemic news and focus on something that makes me happy--I hope you are doing the same.

Our blog hop this month features free saleabration products.  The 2nd release of freebies launched at the start of March and there is so much good stuff to pick from, but I'm still creating with the fantastic Thoughtful Blooms stamp set and Small Bloom Punch--both of which are FREE with qualifying orders.  I love that the punch and stamps coordinate.

I felt the need to celebrate what I hope will be an early Spring with a very flowery and soft card.


For my card I decided to focus on an ombre look, using Gorgeous Grape, Highland Heather, and Purple Posy cardstock layered behind a white panel on which I used the Stitched Lace Die.


I stamped the sentiment from the Morning Star stamp set in white embossing powder on a piece of Gorgeous Grape and then die cut it with one of the Stitched Labels dies.


I tied some Whisper White Crinkled Seam Binding ribbon through both ends of the die cut and wrapped around the back of my ombre panel before adhering the entire piece to a Thick Whisper White card base.


I stamped and punched multiple flowers in Gorgeous Grape and Highland Heather, and then stamped off once in Highland Heather to create a slightly lighter colour for the third part of the ombre.  Moving from left to right I randomly adhered the flowers, getting lighter across the card for a further ombre look.


I added some smaller plain white flowers in a few gaps and accented those with basic rhinestones for a little sparkle and shine.


Inside I again stamped multiples of the flower images in all three shades of purple, and left lots of room for a handwritten message to the recipient.


Salebration ends on March 31, don't miss your chance to earn some great freebies while supplies last!

Hop along to these sites to see what the rest of the team created this month:


JustBStamping (Barb--you're here!)

Sunday, 25 February 2018

Free Sweet Soiree Cards from Memories and More


I dreamed once of being a scrapbooker....documenting my child's life with pretty paper and embellishments so that one day he could look back fondly on his childhood.  Then my son turned 6 months old, I went back to work, and my dreams remained...dreams.

As time passed I became overwhelmed with the volume of what still had to be documented, and thought it was impossible.  And then I heard about "pocket scrapbooking."  I won't get into too much detail, but basically this is approach takes traditional scrapbooking, scales it down to manageable squares, and helps you get pages done!

Even better, the market exploded with beautiful papers scaled to this smaller size, and perfect for doing double-duty as card fronts!!  Last year Stampin' Up! announced their own line, called "Memories & More," and I was thrilled to have spent some time making cards with the Sweet Soiree pack this weekend.


Can you believe that paper?!  That is just one of 72 large, double-sided cards in this pack (there are also 20 smaller cards) that you get FOR FREE with a qualifying purchase during Sale-a-bration.

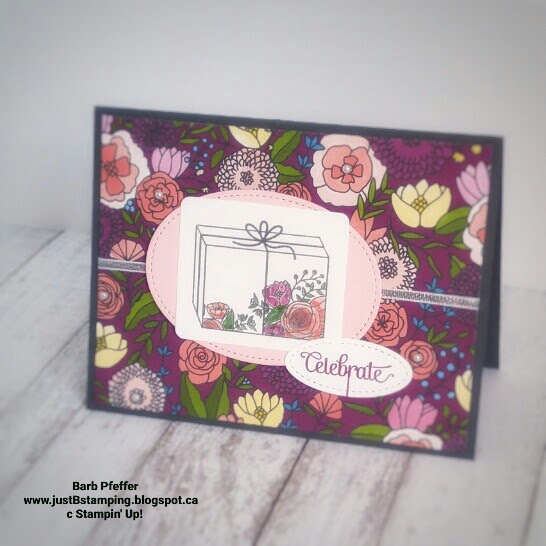
The colours in this pack are so pretty and vibrant that I knew I wanted to pair it with some silver embossing powder, just to help it shine.  Of course in my shot above you can't see that glimmer....but here is a closer shot of the pretty present:


The present and sentiment are part of the coordinating Sweet Soiree bundle, or you can buy just the stamp set separately as well.  I stamped the present on a small piece of whisper white and rounded the corners, then added just a little colour with my blender pen and Calyspo Coral, Rich Razzelberry, and Garden Green inks.  I was able to add dimension to the colours by adding layers of ink to certain spots.


I mounted the present onto a Stitched Oval cut from Pink Pirouette cardstock, and added a smaller stitched oval with my sentiment, "Celebrate", stamped in Rich Razzelberry ink.  Both ovals are popped up with dimensionals and mounted to the front, after running a small band of Silver Ribbon around the card, to ground the center focal point, and then mounted on a Basic Gray card base.

Did you notice the tiny pearls???


This card was so pretty and feminine already, but I wanted to take it over the top with those tiny pearl accents in the middle of some of the flowers.  Aren't they sweet?!

And on the inside....even MORE flowers.


I think this card could easily be for a wedding, anniversary, graduation, promotion--the sky's the limit!

And a couple others that I made with fronts from the same Memories and More pack.  And there are still oodles and oodles left! 


What special event are you looking forward to in 2018?

Barb


Product List
<!-------- TAMS End --------