MENU

Sunday 28 January 2018

You Are Legendary!

What do unicorns call their father?  Pop-corn!

There's nothing like starting your week with a little punny goodness. And it helps introduce my card this week, featuring the oh-so-cute unicorn from the Magical Day stamp set.  This image is super sweet all on its own, but paired with a sponged "rainbow" and the new Glitter Embossing Paste, it's....legendary. :)


Isn't this a sweet idea?!  I cased a pin from Pinterest and am so pleased with the Stampin' Up! version.  I coloured my unicorn pink with a flowing rainbow mane using my Stampin' Blends.  They are so much fun to play with!  And did you notice I gave the rainbow treatment to the uni-corn too?  Here is a closer look:


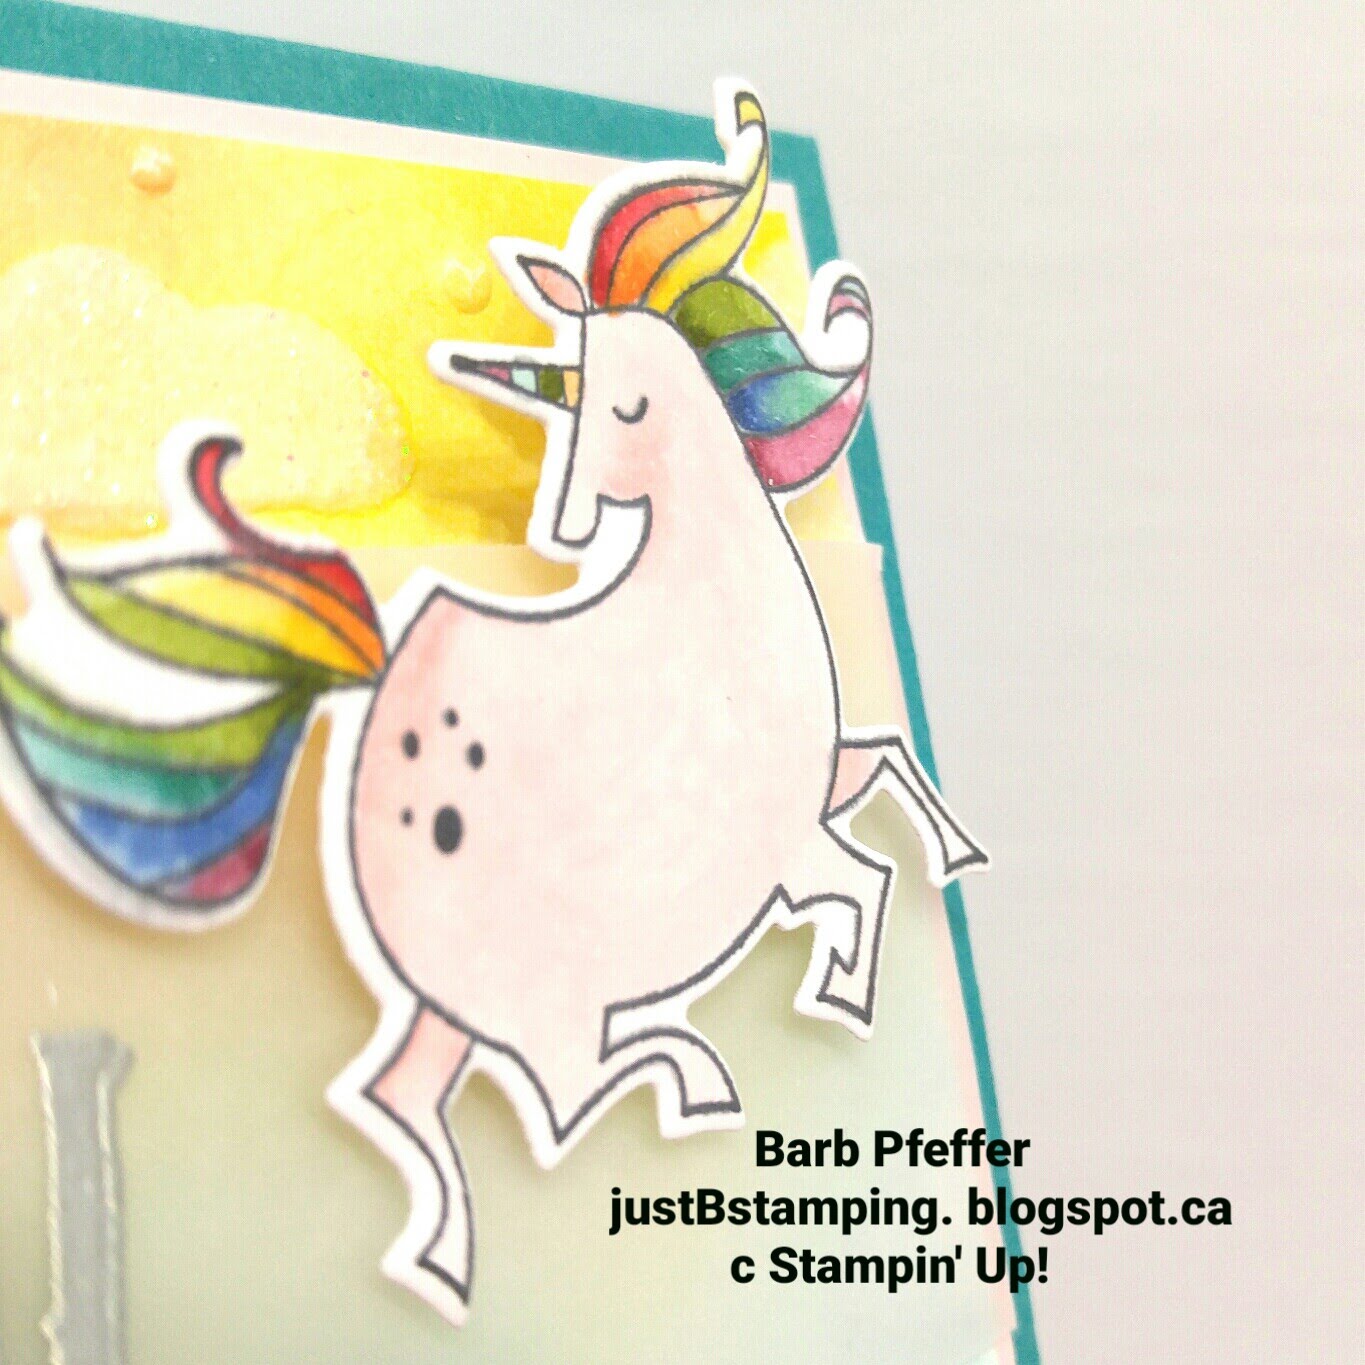
From this closeup you can also see a little of my sponged background.  It was a multi-step process:  first I used daubers to sponge some Melon Mambo, Crushed Curry and Pool Party ink onto a Whisper White background, and then embossed it with the Softly Falling TIEF.  Finally, I used the cloud mask from the Party Pattern Decorative Masks along with the new Shimmery White Embossing Paste to make my clouds sparkle.  I'll be honest, I did a little happy dance when I removed the mask and saw how pretty the clouds were.  You get it, I know you do!


I mounted my background on a piece of Pink Powder, and heat embossed my sentiment in silver on a strip of vellum, which I wrapped around the whole thing. Then I glued the whole shebang to my Tranquil Tide card base.  I used the coordinating thinlit dies to cut around my unicorn, and then mounted it on some dimensionals to the vellum strip.

Because I had done soooo much to the front of my card, I kept the inside quite simple.


Wouldn't this be a sweet card for the little girl in your life?  Or her friends?  Or your friends?  :)  We all deserve a little magic on our birthday, right?!

Interested in a creative escape of your own?  Join me in my craft room and we'll take some legendary me-time together!  Email me to make arrangements.

Have a fantastic week!
Barb


Product List

Sunday 21 January 2018

Pretty as a Peacock

Another week has flown by!  I am happy to say I was able to carve out some crafting time for myself--hope you can say the same!  Life is busy and it's so easy to put ourselves last.  Making a little bit of time for myself each week is my New Year's resolution this year. :)

I am LOVING all of the FREE Saleabration products from Stampin' Up! this year.  With a free item of your choice for every $60 spent, you can't go wrong!  Even better, become a demonstrator with NO OBLIGATION and get a special deal PLUS two free stamp sets.  Best deal of the year!!!

My card this week features the Beautiful Peacock stamp set.  A few years ago my Mom (hi Mom!) made a beautiful pieced peacock quilt, and ever since I have been seeing peacocks everywhere.  Mom, you trend-setter you!  When I saw this stamp set in the free Saleabration brochure I knew I finally had to get one.


I started by stamping my peacock in Island Indigo ink on a whisper white stitched circle; then I added a multi-coloured tail by sponging Emerald Envy and Elegant Eggplant on to the two-step stamping tail piece.  This is such a great feature of Stampin' Up! stamps these days; I'd love to show you how easy it is to accomplish this fantastic look at a class sometime!

I added some flourished "feathers" to my peacock by stamping twice without re-inking with Elegant Eggplant.  This a great way to get more mileage from your ink colours:  you can get several variations of the same colour by simply stamping multiple times.  My Technique Tuesday class is a great way to learn about simple techniques like this.  :)


I used some of the smaller stamps in the set to make patterned cardstock circles for my background, using colour-on-colour to give dimension without making the background too busy.

I ran a piece of Whisper White cardstock through my Big Shot with the Polka Dot Basics embossing folder, keeping with my circle background theme.  I popped my stitched circle up on some dimensionals to give my card some 3D powder, and added a small sentiment on a Whisper White banner, along with a small bow using Whisper White Organza Ribbon.  I think it adds just the right finishing touch.

I kept it simple on the inside of my card, adding another stamped and sponged peacock partially on the lower right corner, and stamping "happy birthday" in the centre.

I'd love to have you join me on my next creative escape.  Please consider emailing me if you are interested, my class dates and times are flexible. :)

Have a great week,
Barb 


Product List

Monday 15 January 2018

Bright & Cheery Blog Hop (Tri-City Stampers)


Why is it that Mondays are so much harder in the winter?  Is it that I go to work in the dark and come home in the dark?  Or that I spend all weekend snuggled up in my warm bed binge watching Netflix?  This weekend I tried to overcome that urge to hibernate and spent some time in my craft room playing with some new Stampin' Up! Occasions and Sale-a-bration items, pairing them with some sets from the annual catalogue that I set aside for Christmas--some of them have never even seen ink!  That's one of the best parts of Stampin' Up! for me:  the coordination of products so that you don't have to start from scratch every time. 

I'm thrilled to participate this week in the monthly Tri-City Stampers Blog Hop, featuring my co-members in my upline's team.  Our challenge this month was to create a "bright and cheery" card to help combat those winter blahs, and I have to say, it worked! 

My card features the Celebrate You Thinlits, which are dies you can get for FREE with a $120 purchase.  That's right--FREE dies!!  And I love the fonts that come in this set.

For me, nothing is as bright and cheerful as a rainbow, so I broke out a bunch of bright ink pads and my aqua painter and got to work watercolouring a rainbow background:


Next I stamped and punched seven balloons using the Happy Birthday Gorgeous stamp set and coordinating Balloon Builder Punch, and white embossed three balloons on some vellum paper as well.  By adhering the vellum balloons to some of the solid colour balloons I was able to get a lighter variation in colour, without needing more colours of cardstock.  Vellum is a great way to stretch your colours even farther!

I used the "celebrate" die from the free die set to cut my sentiment from silver glimmer paper, and I bent it slightly when adhering it to my background piece so that it formed an arch, rather than being straight.  I thought this helped cement my rainbow theme pretty well!

I attached all of my balloons across the bottom of my card, popping some of them up on dimensionals to give a 3D effect, and "tying" them all with silver thread that wraps underneath and is adhered on the back of the layer.  I added a very thin black layer behind my watercoloured piece, and then attached the whole thing to a Real Red card base.


What I love about this card is that it could be used to celebrate anything--a birthday, anniversary, retirement, graduation, award....well, you get the idea.  In order to keep it general I didn't stamp a greeting on the inside of the card, but rather stamped "Hip Hip Hooray" and a couple more coloured balloons.  This way I'll be able to use this card for whatever celebration I want.  :)


Throughout the week I'm going to post some pictures of other bright and cheery cards I made, so be sure to follow me on Facebook or Instagram (@justBstamping) to see everything I worked on this weekend.  And check out my teammate's designs too, they are sure to cure any lingering winter blues you have!  Just click the links below:

JustBStamping (Barb--you're here!)
 
Have a great week!
Barb


Product List