I am beyond excited to share that I have been invited to be part of the Creation Station Design Team Blog Hop! Today is my very first hop with this wonderful group of people and I am thrilled to be here. Thank you for stopping by my little piece of the internet. :)
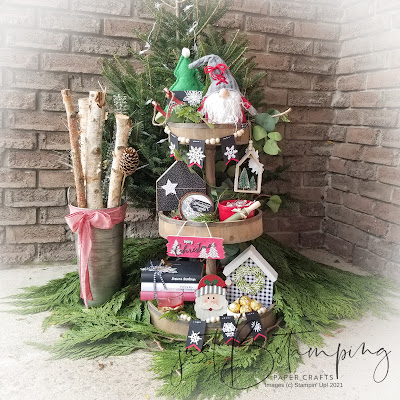
Our theme today was "Anything But A Card"--which is right up my alley! I love making 3D projects and may have gone a bit overboard here....but I couldn't help myself! I have been admiring the tiered tray trend for awhile now, and wanted to do something extra special for my first hop, so I made a multitude of Stampin' Up! inspired tiered tray decorations to share with you today.
If this is your first visit to my blog, welcome! I am Barb, an Independent Stampin' Up! Demonstrator in Cambridge, Ontario, Canada, and I love to share the joy of paper crafting with others. This is my creative escape from all the stresses of life! Thank you for spending a few minutes of your time here with me today. I would love to hear from you, if you have time to leave me a comment--it makes my day!
Before we get started, I have used a LOT of different supplies in my projects today--so I have highlighted the names of the products and colours I used to make it easy for you to reference if you would like to make something yourself. All of the supplies can be purchased in my online store if you live in Canada as well, and I would be honoured to be your demonstrator if you are inspired today. :)
On to the good stuff! I'll share pictures and details of the individual pieces on my trays below, but here is the big picture of the complete display:
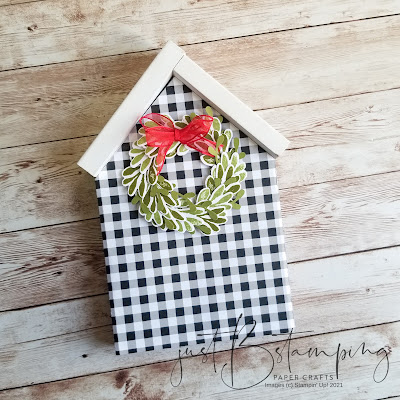
Houses
To one of the houses I added a gorgeous wreath made from greenery images in the Christmas Season Stamp Set, stamped in Pear Pizzazz and Old Olive and die cut with the coordinating Seasonal Labels dies. I interspersed a few Sprig Punch pieces in Old Olive too, along with a Real Red Sheer Ribbon bow.
The smaller house I kept simple (and roofless!), with a Linen Thread bow and a layered die cut star from the Christmas Trimmings Die Set in Basic White.
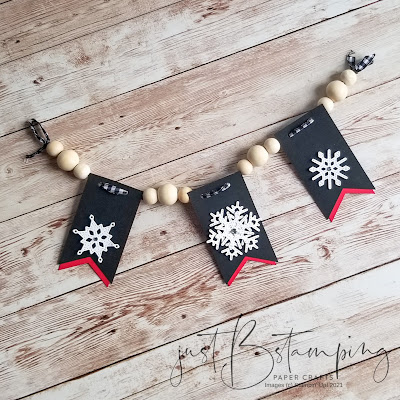
Banners
I created two small banners for my display, using Real Red and Basic Black Cardstock. I used my retired Triple Banner Punch, but you could absolutely cut the banner by hand with this quick tip: cut straight down the middle of your cardstock, then cut in from the outer corners to the end of your middle cut line. I added different Stitched Snowflake die cuts, popped up on dimensionals with rhinestone centres, to each banner, and threaded them onto Black & White Gingham Ribbon with some wood beads as separators.
Stacked Books
I covered some more scraps of wood in cardstock and DSP to make my book stacks. I gently wrapped the paper around the rectangle of wood, making small indentations of where the "spine" would fall, and then stamped my book titles before applying to the wood with Tombow liquid glue. I wrapped the stack with more Black & White Gingham Ribbon, and added a cluster of stamped and die cut images from the Christmas Season set. This has been my go-to set this year!
Signs
I had two unfinished wood signs in my stash that I thought would be perfect for this project. For the chalkboard sign, I heat embossed an image and sentiment from the Poinsettia Petals set in White Embossing Powder. I added some pearls to the sign and decorated the base with some scraps of pretty paper from the Heartwarming Hugs DSP pack.
The second sign I painted red and heat embossed tree images from the Perfectly Plaid set in White Embossing Powder. I added a "Christmas" die cut (you could use the Word Wishes dies) from Basic Black with a heat embossed "Merry" from the Merry Snowflakes set. Both are popped up on adhesive foam sheet for some added dimension.
Decorated Wood Slice
I had some wood slices remaining from another project. I painted the centre of the slice with white craft paint, and then stamped the large Words of Cheer floral image in Memento Black ink on top. I coloured the image using my Blends markers, and added a sentiment from the Tidings & Trimmings Stamp Set embossed in white on black cardstock.
Ornament
I found this sweet wooden ornament in the holiday aisle of my local store and wanted to jazz it up! I added strips of the beautiful Painted Christmas DSP to the sides of the ornament. I stamped the pinecone, berries, and leaves images from the Christmas Season set in Garden Green, Blushing Bride, Soft Suede, and Crumb Cake, and added it to the front of the ornament along with a sparkly White Glittered Organdy Ribbon bow.
Final Touches
I purchased a blank mini wood rolling pin and kept it very simple, just wrapped in some more DSP from the Heartwarming Hugs pack, with a Gold Shimmer Ribbon bow.
To my tray I added some greenery, scented pine cones and lights, an adorable gnome and his Christmas tree, a candle and some treats. Santa is even tucked in there, can you find him?!
I am so appreciative of being included in this event, and I look forward to hopping along with you each month! Please leave me a comment before you head over to see what Sara Levin has for you today at the Artful Inker.


Wow--just a wonderful display. Love how you used so many elements to upscale all of your found pieces. Welcome to the team--look forward to all of your inspiration!!!
ReplyDeleteWhat a beautiful centerpiece! Love how easy you've made it look to elevate basic pieces and turn them into something special.
ReplyDeleteWe don't mind you 'going overboard', it looks beautiful! And it really feels like Christmas 🥰
ReplyDelete