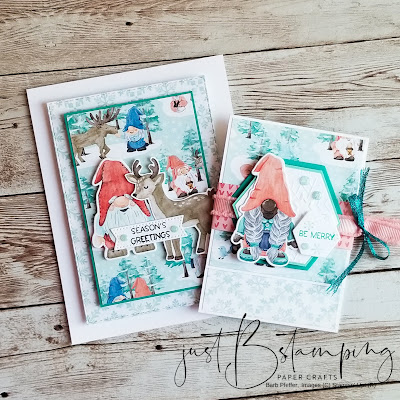
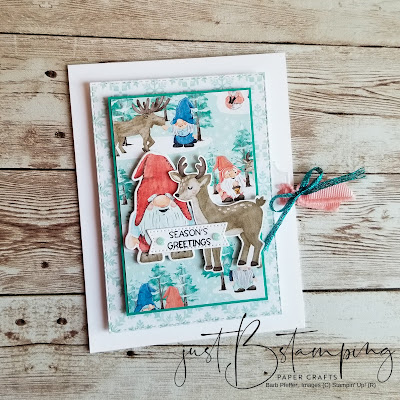
I have been waiting so impatiently to share my projects for the Creation Station Fun & Fancy Fold Blog Hop with you!! This amazing flap fold card is so much fun to make--and to receive!
Thank you for stopping by today. If you have arrived from Yvonne Spikman's blog as part of the hop, welcome! You can keep hopping my clicking on the next button at the end of my post--there is so much to inspire your creativity this month.
My card starts with a standard 4.25" x 11" Thick Basic White Cardstock base, scored at 5.5". I created the flap mechanism separately from the card base, and then added it when it was complete.
The flap mechanism is created from THREE separate cardstock/DSP pieces, and a pull tab.
1st Piece (background): I used a Stitched Rectangle Die (4.75" x 3.5") and my Storybook Gnome DSP (the snowflake pattern) to create the first part of my fun-flap. I mounted the DSP on a rectangle of Thick Basic White Cardstock that is the exact same size, just to give it some stability for the moving parts. In the centre of this piece I punched a "slot" through which the opening mechanism is threaded. You could also use a die to cut the opening, it just has to be wide enough and long enough to allow the Tab to thread through.
2nd Piece (foreground): Another piece of the Gnome DSP was cut to 2-5/8" x 4" and mounted to a Bermuda Bay Cardstock panel with a 1/8" border all around. Narrow little borders are my favourite!
3rd Piece (inside): For the inside piece I have a Thick Basic White Cardstock rectangle (3.5" x 2.25"), which I embossed with the Snowflake Wintry 3D Embossing Folder.
Tab (hidden): I used a die cut label from the All That Dies to make my pull tab. I cut a scrap piece of Thick Basic White Cardstock to 1.5" x 4" and scored it at 2.5" and 2.75". I glued the short end of the cardstock to the back of the "Inside" piece, lining the embossed cardstock up with the right-most score line.
Then I added glued to the quarter-inch between the two score lines, and adhered the Bermuda Bay cardstock piece. That leaves the long tail of the tab, which gets threaded through the slotted opening in the "Background" piece.
Add Tear-and-Tape to the right edge of the Inside piece, and adhere it to the Background piece, centering it on all sides. Trim the tab piece and glue the die cut label to the end, so that it sticks out about 0.5" beyond the background rectangle. I punched a hole in the end of the label and added some ribbon and a bow.
Now play with your mechanism--isn't it cool?!! This whole piece gets added to the front of your card base with Dimensionals. Make sure you don't put any Dimensionals on the Tab piece, it needs to move freely!
Then it's time to decorate. I added a die cut gnome using the Gnome Dies and a fussy-cut reindeer, both cut directly from the Story Book Gnome DSP to the front of my card, along with a die cut sentiment and some Fine Sparkle Adhesive Backed Gems. The inside of my flap hides another die cut gnome and another sentiment (both sentiments are from the Penguin Place Stamp Set).
BONUS PROJECT
I also made a matching gift card holder for today's hop. It's a very simple 3" x 9.75" base scored at 2.25" and 6.5", and then decorated with DSP. There is a decorated belly band too!
Thank you so much for dropping by today, I hope you'll make your own flip-flap card--tag me on Instagram if you do, I'd love to see it! And be sure to leave me a comment and keep hopping by following along to Sara Nell Langland, next up on the hop.
Happy Crafting,


No comments:
Post a Comment