Here we are mid-November and my holiday card making is taking off! I'm so pleased to be part of the Stamping Symphony Blog Hop today where we hope to inspire you with Christmas projects. My card is full of texture and dimension and was so much fun to make! And I have a surprise Bonus Project for you today too, don't miss checking it out. :)
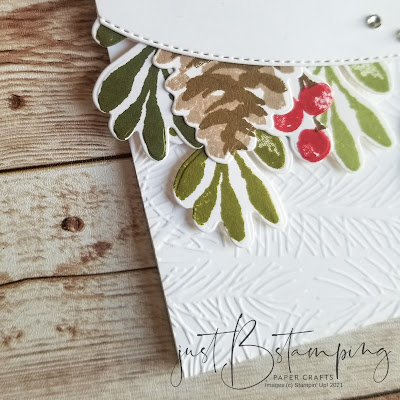
I started with a Thick Whisper White cardstock base (5.5" x 8.5", scored at 4.25") and embossed the bottom two-thirds of my base with the evergreen boughs in the Wintry 3D Embossing Folder pack. It adds amazing depth and texture to the base.
Using the Basic Borders Dies I cut a stitched curved edge into a piece of Whisper White cardstock cut to 5.5" wide, and then trimmed it to be approximately 2" deep at the deepest part. My sentiment is from the Words of Cheer Stamp Set, stamped in Soft Suede, and I curved it to match the curve of my stitched border. Gotta love photopolymer stamps for that flexibility (pun intended!). :)
I stamped and die cut a whole bunch of images from the Christmas Season Stamp Set. I actually found this very therapeutic!! I had a vague idea of the look I wanted to end up with, and just made a pile of images and played with how they would peek out from under my stitched border.
I used a very organic colour palette of Crumb Cake, Soft Suede, Pear Pizzazz, Old Olive, Mossy Meadow, and Real Red to make my foliage. These images are large and streamlined, but with the two-step stamping on the pine cones you still get depth and dimension!
Once I had my foliage laid out I added double-sided tape to the edge of my sentiment piece, and laid it on top of the foliage pieces. I added this to my card base with dimensionals, which lets my foliage lift off the page.
I added a few rhinestones around the sentiment, to complete the front.
For the inside of my card, I took a 4" x 5.25" piece of Basic White cardstock and embossed about 1.5" of the bottom of the piece with the Wintry 3D Embossing Folder. I added a cluster of some left over stamped and die cut images to the bottom right corner, and stamped my sentiment (from the Words of Cheer Stamp Set) in Old Olive in the centre.
If you are interested in any of the products I used I would love for you to shop in my online store. Your support is appreciated more than you know!
BONUS PROJECT!
I made this matching gift bag holder as a bonus project this month! We had a gift-giving theme for our team swap and I had so much fun making this card I decided to morph it into a special 3D bag. I started with a 8"x12" piece of Basic White cardstock, scored and folded into a bag, and then pinched the top so I could add some Real Red Ribbon for the closure. I repeated all the steps from my card front and created a layer that I added to the front of my gift bag. It's the perfect size for a gift card and a little treat or present!
Please be sure to hop along and see all the amazing projects the rest of the team made this month:


Great use of the curves! Never thought of embossing the inside as well! Beautiful!
ReplyDeleteGorgeous gorgeous gorgeous!!
ReplyDeleteLove this! Just beautiful!
ReplyDeleteVery pretty.
ReplyDeletethis is unreal stunning! thanks for sharing your talent. Sue Mac Donald
ReplyDelete